Monday 23 November 2009

Shoot always at 4k... but edit at 2k

Most edits, even for the big screen, are created at a resolution of 2k (2048 pixels x 1080 pixels).

However, if you shoot at 4k you have a few advantages. Firstly you have the same depth of field that you get when you shoot on 35mm film. That should already be reason enough! But for me personally, the real bonus of shooting at 4k is that when you edit in 2k you have an oversized image. This might sound like an unnecessary waste of file size and storage, but when you are editing your footage, it means you can change the crop, zoom in and out of the image or even take out any camera moves with steadying effects.

There is a particular shot in Light Rain (below) where we have a slow and steady zoom into Jade's face. This was created completely in post with a slow up-scaling of the image. As the image was originally shot at 4k, we don't lose any of the details or get any unwanted pixilation. This was a real life saver in the edit as the slow move really helped the shot. This really makes it worth shooting at 4k...even with all the extra storage headaches and workflow problems you will incur.

The digital media is recorded on to a 320GB hard drive (approx 3hrs at 4k), or 8GB CF Cards (approx 4 minutes at 4k). As it is a tapeless format, the data needs to be backed up on to portable drives and so a good DIT is always recommended with an onsite laptop and backup drives.

The RED One records the data as a R3D RAW file, which is basically the video equivalent of RAW files in stills photography. This means that you have much more flexibility with color correction and adjusting different levels in post-production without being destructive to the image.

The huge file sizes that 4k will produce can be really problematic in your workflow. Therefore it is best to create an offline edit (low res version) and edit all your content from there. Then once you have all your footage in the correct sequence you can take the timecodes from the offline edit and simply place them into the online edit...hey presto you have a high res edit made from your offline timecodes.

Sounds simple? Well it doesn't always go as smoothly as that and sometime cross-pollinating software is a recipe for disaster as sometimes they don’t recognise each others timecodes, but if you can work through the temporary glitches and buffering issues it will be worth it in the end. And when you see the final results, you won't want to shoot on anything other than 4k!

This is handy screensaver as a good reference for all the different format sizes.

Wednesday 18 November 2009

The Survivor - Preview Poster

Here is a mock poster preview for a short film I am developing called 'The Survivor'. It perfectly hits the tones I am trying to explore in the book and this snap shot is indicative of our hero's lucid dream state.
This is the look and feel I want to have in the 'journey' part of the film. But how are we going to film it to look as good as this poster and stay on budget?...CGI?...water studio with green screen? Model miniatures? On location with heavy post-production VFX? So far, I have no idea which route will be the best one, but all I do know is...where there is a will, there is a way!

Wednesday 11 November 2009

Correcting Movie Mistakes

Here from Ridley Scott's epic 'Gladiator', you can see a big 'movie mistake' on the back of the chariot. In all the action, the gas cylinder that was used to thrust the chariot over has become visible as it dislodges its hiding place.
The likelihood is that it was just missed when the director viewed the rushes and then it was too expensive or too late to re-shoot the scene.
The point is that these things can happen at any stage in film making and noticing them before release is the hard part. However, once you have spotted a mistake, you can either choose to ignore it or you can correct it in post-production (but this can be costly and time consuming - so your budget and deadline might suffer).

If you do choose to ignore the errors and bury your head in the sand, you are only inviting criticism on the production values of the shoot. Just because YOU didn't originally notice the mistake, does not mean that an audience with fresh eyes will miss it as well.

All too often a big film will go out with some pretty big 'known' mistakes, but when you have the pressure of a big studio breathing down your neck, it is a risk you have to take into consideration.

This is a before and after comparison of a mistake that crept into the shooting of Light Rain.
The scene shows people taking shelter from a heavy deluge. We had two big rain towers providing rain FX in front of the cast, but in the distance and out of focus we did not have the need for any rain FX. There is no point in spending money to wet down an area that is not clearly visible...but it did mean that in the background we found a rouge pedestrian happily walking across the set during a take. Clearly it was a small problem, but one that was ruining the shot.

Here we had our story saying that the rain was so bad that people needed to take cover...and then, just in the background we had a figure slowly meandering across the concourse with no umbrella! Clever!
So we decided to correct this shot. Fortunately we had the expert knowledge of VFX supervisor (and all round nice guy) Blake WinderBlake has worked on some really epic Hollywood films from Hellboy 2 to 10,000BC, so digitally removing this figure was not going to pose any problem for Blake...in fact he did it in a few hours with a fairly simple mask.

Yes, it is such a small detail to remove...and yes, it did take extra time and budget...and yes, most people might not have noticed the figure or perhaps they would have been too distracted by the rest of the action in the shot. But in my opinion it is the small details that matter. It is the fine refinement and attention to detail that others wouldn't have bothered to correct that takes a film to a more polished level...and ultimately it makes for a better final film.

Thursday 5 November 2009

Turning bad photos in to good ones!


When I am not filming, I like to take photographs with my Nikon D60, I find that it helps to improve my composition and framing of shots...plus it is a lot cheaper to take a quick snap than to wait till the reccie stage of a shoot. Practice makes perfect (so they say) and it is a great exercise to hone the skills and keep an eye out for new ways to position a camera.

Stills photography is very much like shooting film photography...in fact, it is exactly the same apart from with stills you have a single picture and with film you have 25 stills in every second!

However, when taking a still, you need to have a good image as the viewer will scan every area of the picture for much longer - it will be subject to total scrutiny. In film, you can get a way with certain errors (to some extent). That does not mean you can be sloppy in production, but it does allow for certain 'natural' mistakes to be glossed over a little bit because the eye is distracted by the move of the camera, the action in the scene or the viewer is completely engaged in the dialogue.

With that in mind, how do you take a good photograph? Well to be honest, there are plenty of websites out there that can help you learn composition, framing, focus, lighting, etc. But the best way is to pick up your camera, go out and learn from your mistakes! It's simple, the longer you spend with a camera in your hand; the better you will be at improving the shots you take.
http://www.photo.net/ is a truly fantastic site that has tips and advice for all levels of photographers. Their learning section is extremely useful and you can get good advice on treating your photographs in post-production too.
The above photo comparison was not taken with my usual camera and so the picture had a lot of problems with it. When I was looking at the potential shot, I was trying to get the light to crack through the trees and give a lens flare across the image. Then I wanted some of the bracken to have flecks of light highlighting the foliage to make the scene magical and atmospheric.

Clearly when I looked at the pictures I had taken I was very disappointed. The image is under exposed, the lighting is minimal and fairly flat, the clarity of the image is not very good and the saturations of the colors are a bit lost. All-in-all, it was a nice idea that didn't work in the camera...but that does not mean you have to hope for better next time as you press the delete button. Have you ever considered reworking your images in post-production?

The big secret is that every single professional film you have ever seen has been treated/corrected in post in some way or another...films are NEVER released using the footage straight from the camera...so why can you not retouch your stills in the same way to get the effect you want?

This photograph was about 30 mins worth of work to correct to the finished image and I think it is much closer to what I had originally wanted in the camera.
Firstly I adjusted the exposure and increased the saturation...then I added a light layer to emulate rays of light shining through the trees and of course the all important lens flare (lens flares in post are massively over used these days and can make an image look tacky...but when used correctly, they can really sell the scene).
Then I used the dodge tool to pick out certain highlights on the bracken, by increasing your lights and darks, you are actually affecting the lighting in the scene and making the image less flat...and therefore, visually more interesting. Then I applied a quick warm filter and a bit of contrast and then hey presto!

What was once an image that was heading for the trash icon has now become an image that I really like. Most photos can be improved with a bit of post-production, so why not try reworking some of your old pictures to see if you can improve them? You might be pleasantly surprised!

Monday 2 November 2009

Little Spitfire video makes film critic's choice


My 2007 music video has this week become the critic’s choice by the UK’s largest independent movie review site. Two years after winning ‘best music video’ award at End of the Pier International film festival, it has resurfaced in popularity.
MiShorts say, 'Our monthly films reviews are provided by Future Movies, one of the UK’s top review websites. Their editors are a recognised source of movie reviews worldwide and regularly appear on the world’s largest review website, Rotten Tomatoes. You can trust these guys to tell you what they really think about our films'.
Guest critic, Jay Richardson is an award-winning arts and entertainment journalist. He writes reviews and features for Future Movies, as well as regularly contributing articles for the Scottish and Irish national press.
Jay says,
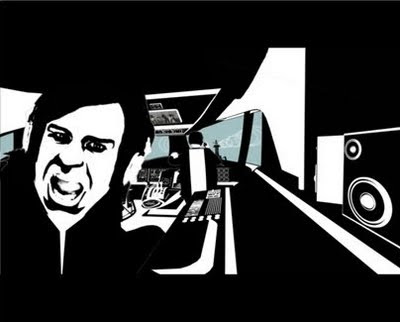
This award-winning, debut promo from rock band Little Spitfire prompted their signing to an independent label and stands as a starkly memorable calling card for director Neil Horner. Conceived as a riposte to traditional broadcast media’s impenetrability, the band is discovered flying a plane at an enemy control tower, assaulting it with their sound. Shot on digital with bold use of colour and black & white supplemented with sparing use of blue and green, the desaturated 3D footage distinctively pairs elaborate make-up with green screen technology, producing dramatic action shots that ape Japanese anime in the harsh, almost spectral intensity of the band’s expressions.
Thanks to Jay for such a nice review (of course I completely agree with him! :D ) and thanks to MiShorts for making it their official choice.

Little Spitfire and many more great films can be seen here at Mishorts.